
Buried, But Very Much Alive

Updated: Apr 30
The floor-to-ceiling glass look architects draw on paper doesn't start with the window. It starts with how the window is installed.

There is a version of this conversation that happens on job sites all over the country, usually after the fact. The window is in. The siding is on. And the frame is showing, not much, maybe an inch of aluminum at the perimeter, but enough. Enough to break the line. Enough to make the glass look like a window instead of a wall.
The architect specified the right glass. The right finish. Possibly the right hardware. But nobody specified the installation method, and the default method, nail flange American-style, made the buried frame detail impossible before the first stud was plumb.
This is a story about that method, and the one that replaces it. Block-frame installation. It has been standard practice in European construction for decades. In American wood-frame construction, it remains underspecified, poorly understood, and almost entirely absent from the conversation until it is too late to have it.
Two Methods. One Winner.
Every window installed in a wood-frame building gets there one of two ways. The first is nail flange, which is what most American manufacturers produce by default and what most contractors install without thinking twice. The second is block-frame installation, which is what you need if the frame is supposed to disappear.

The difference starts with the anatomy of a nail flange window. The flange is a thin strip pressed onto the side of the frame, not extruded from it, that runs around the window perimeter. Before siding goes on, the window gets set into the rough opening, the flange gets fastened to the sheathing, and adhesive membrane tape gets run over it to seal. Siding comes next and covers the whole assembly. The window is in, the wall is closed, and the frame is fixed exactly where the manufacturer put it.
That fixed position is the first problem. The flange location determines how far the window projects to the exterior and how much frame is exposed on the interior. On a standard 2x6 wall with half-inch sheathing and standard siding, the geometry works out more or less.
Add an inch of continuous exterior insulation, furring strips, and a heavier cladding profile, and the wall buildup now exceeds the window projection. The frame is not flush. The frame is recessed. And the detail that was clean on the drawing set is not clean in the field.
The second problem is what happens later. That flange and its tape are buried under cladding. When the window eventually needs to be replaced, the cladding comes off first. There is no version of nail flange installation where future replacement is not a demolition project.
Block-frame installation solves both problems at the source. There is no flange. The window is screwed directly through the jambs and head into the framing, shimmed plumb and square, and sealed at the sheathing with backer rod and caulk. The window can be set at any depth within the wall assembly. Interior finishes return flush to the glass.
Cladding runs over and past the frame on the exterior. The frame is there. You just cannot see it.
The detail that was clean on the drawing set is not clean in the field. And by then, there is nothing to be done about it.

The Nail Flange Problem, In Detail
The nail flange was not always a compromise. When aluminum windows entered American residential construction in the late 1960s, the flange was extruded as part of the frame profile. It was structural. The window went in through the flange, and the flange did real work.
What is sold today under the same name is a different thing. Modern American manufacturers press the flange into a kerf rather than extruding it. It sits in a groove -- not structural, not watertight, and not one piece with the frame, which means the corners are joints, and joints are failure points. The flange is now primarily a surface for flashing tape. Structural fastening happens through the jamb. Water management happens through the tape.
None of this is invisible to the industry. Manufacturers know it. Contractors work around it. The flashing details have become more elaborate to compensate. And for a standard build, on a standard wall, with standard siding, the system works well enough that few people question it.
The problem surfaces at the high end, where wall assemblies are deeper, cladding is heavier, exterior insulation is specified, and the architectural intent requires a frame you cannot see. In those conditions, the nail flange method cannot deliver what the drawing shows. The geometry of the flange locks the window into a position that will leave frame visible on at least one side.
The only way to bury the frame is to not use a flange at all.


This is not a workaround or a specialty product. Block-frame windows are manufactured by the same companies that make flanged windows. The difference is a specification decision, made early, before the rough opening is framed and before the window is ordered.
The Anatomy of a Nail Flange Window
THE NOSE: The portion of the frame projecting past the flange to the exterior. Typically 1 inch on a standard profile. This determines how much wall buildup the installation can accommodate.
THE FLANGE: Pressed-on, not extruded. Seated in a glue groove. Multiple corner joints. Taped with 4-inch adhesive membrane (butyl, asphalt-based, or acrylic).
THE THROW: The remaining frame depth projecting to the interior. Typically 5 inches on a 6-inch frame. This determines interior reveal dimensions.
THE CONSEQUENCE: The flange location is fixed at the factory. You cannot adjust the window's position in the wall after the fact. What is specified is what gets built.

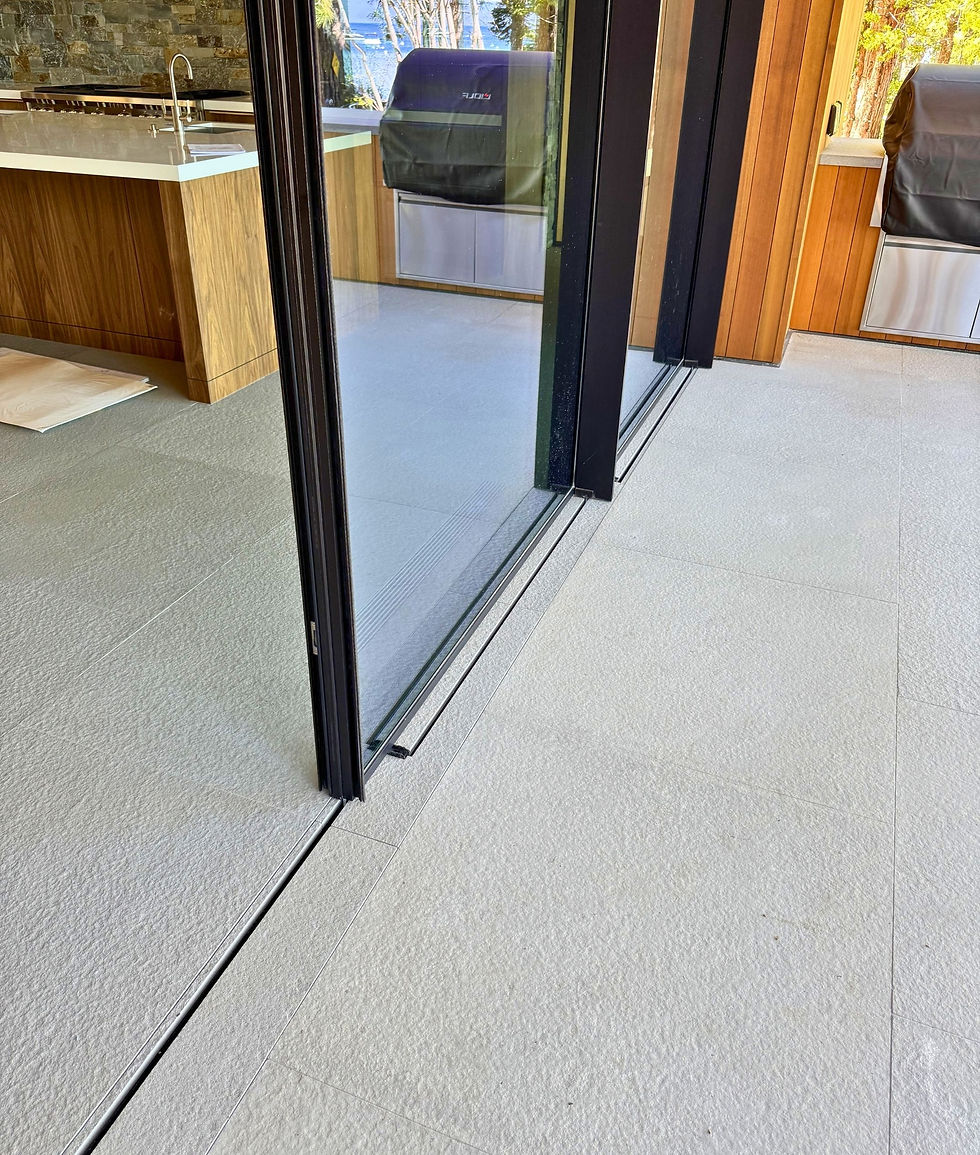
What Buried Looks Like
The images above show what the buried condition looks like in practice. At the sill, the floor finish runs to the glass and the track is the only evidence that a window frame exists below the surface. This is the condition block-frame installation makes possible, and it requires planning that starts before the slab is poured or the subfloor is framed.
The interior condition is achieved by furing out the surrounding wall so that drywall returns finish flush with the inside face of the window frame. Jamb liners are sized to the wall assembly. The frame sits in the wall, the wall comes to the frame, and the junction is a paint line. The same logic applies at the ceiling -- finish material runs to the frame, not past it.
There is no casing because there is no reveal to conceal. The glass meets the wall.
Cladding is detailed to run past and over the window frame rather than butting up to it. The frame is sealed to the sheathing with backer rod and caulk before cladding goes on. After cladding goes on, the frame is invisible. The only remaining evidence of the window's presence on the exterior is the glass itself.

Water management in this system is handled in two stages. The exterior caulk line manages bulk water: rain hits the cladding, runs down the face, and sheds past the frame without ever reaching the sheathing junction. The interior caulk line provides the air seal. These are two separate operations with two separate jobs, and specifying both matters. A single caulk line trying to do both is the kind of shortcut that performs adequately until it doesn't.
Because there is no siding-to-frame butt joint, the condition that fails in most nail flange installations, there is no single point where water can enter and tracking can begin. The failure mode that plagues flanged window installations, water wicking behind tape that has lost adhesion, simply does not exist in a properly executed block-frame detail. The cladding is not bonded to the installation. It runs over it.
The payoff of getting this right is not only visual. A block-frame window installed this way can be replaced from the interior without disturbing the cladding. The frame is accessed through the glass side. The siding stays on the wall. Future service is not future demolition. For a building owner, that distinction matters over a thirty-year horizon in ways that are difficult to quantify at the time of specification and very easy to quantify the first time a window needs to come out.
The Specification Conversation

Block-frame windows are not a specialty product. Every major window and door company that serves the architectural market offers a block-frame profile. The issue is not availability. The issue is that nail flange is the default, and defaults do not get questioned unless someone in the specification process knows to question them.
That conversation needs to happen at the drawing set stage, not at the shop drawing review stage. By the time shop drawings are on the table, the rough openings may already be framed, the wall assembly is locked, and the window is likely already ordered. Changing it at the specification stage costs nothing.
The coordination required touches more trades than the glazing contractor alone. The framing crew needs to know the window setback. The flooring or concrete contractor needs to know the sill condition. The cladding crew needs to know how the cladding terminates at the opening. None of this is complicated if the information exists on the drawings. All of it is complicated if it does not.
What follows is the minimum checklist for an architect or project manager who wants the buried frame detail to survive from drawing to installation without losing anything in translation.

Buried, But Very Much Alive

The frame does its best work when you cannot see it. That is not a paradox. It is an engineering reality.
A window frame installed with a block-frame detail is not absent from the wall. It is doing exactly what a frame is supposed to do: holding the glass, managing the load, sealing the assembly. It just does all of that from inside the wall, where it belongs.
The architects who get this right do not get there by accident. They get there by specifying the installation method, coordinating the trades, and having the buried frame conversation early enough that there is still time to act on it.
The Surly Crab project was not a complicated building in terms of its glazing system. It used windows available from standard manufacturers, ordered through standard channels, installed by a crew that had done it before. What made the detail work was knowing what to ask for, and asking for it before the framing was up. No custom fabrication. No value engineering compromise. No field condition that required anyone to improvise.
That is the whole story. The rest is installation.


Comments